Lab-1-1
(8% of the course mark)
Fundamental Network Concepts
- This lab is designed to provide you with practical, hands-on experience in applying the network concepts, software, and techniques demonstrated by the instructor in class.
Lab objectives
-
Apply theoretical network concepts to real-world scenarios.
-
Foster a deeper understanding of Web development via fundamental network concepts.
IP Address Lookup
-
Navigate to: https://www.iplocation.net/ip-lookup.
-
Scroll down until Geolocation data from IP2Location is visible.
-
Check the ISP information, does it match your ISP vendor?
-
Capture a screenshot showing the Geolocation data from IP2Location and name it IPAddressLookup.png.
Domain Name Lookup
-
Navigate to: https://www.site24x7.com/tools/find-ip-address-of-web-site.html.
-
Enter a domain name of your choice and click on Find IP.
-
Click on Check Website Availability and wait for a few moments until the results are shown.
-
Capture a screenshot showing the results and name it check-website-availability.png.
-
Click on Ping Website and wait for a few moments until the results are shown.
-
Capture a screenshot showing the results and name it ping-availability.png.
-
Click on DNS Analysis and wait for a few moments until the results are shown.
-
Capture a screenshot showing the results and name it dns-analysis.png.
Online Traceroute
-
Navigate to: https://traceroute-online.com.
-
Enter a domain name of your choice and click on Traceroute!.
-
How many hops before it reached the destination? Capture a screenshot showing the number of hops and name it traceroute.png.
HTTP Method and Status Testing
-
Download and extract the file HTTP-Status-App.
-
Open Visual Studio Code and open the extracted folder: HTTP-Status-App.
-
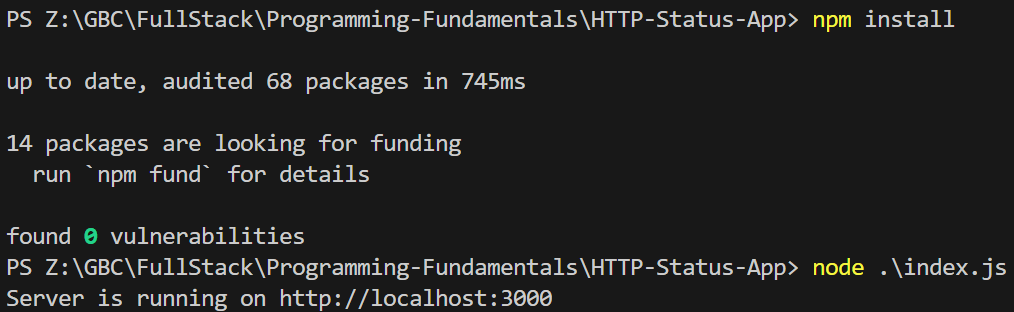
Open the terminal and type the following:
npm install
node index.js
Ensure that the node app is running before you continue.
-
Open Postman and click on the menu icon, then File > New > HTTP.
-
In the Method dropdown list, select GET, and enter http://localhost:3000/success in the URL text box and click on Send.
-
Take a screen shot of the result and save it as method-get-http-code-200.png.
-
In the Method dropdown list, select POST, and enter http://localhost:3000/create in the URL text box and click on Send.
-
Take a screen shot of the result and save it as method-post-http-code-201.png.
-
In the Method dropdown list, select GET, and enter http://localhost:3000/bad-request in the URL text box and click on Send.
-
Take a screen shot of the result and save it as method-get-http-code-400.png.
-
In the Method dropdown list, select GET, and enter http://localhost:3000/unauthorized in the URL text box and click on Send.
-
Take a screen shot of the result and save it as method-get-http-code-401.png.
-
In the Method dropdown list, select GET, and enter http://localhost:3000/forbidden in the URL text box and click on Send.
-
Take a screen shot of the result and save it as method-get-http-code-403.png.
-
In the Method dropdown list, select GET, and enter http://localhost:3000/not-found in the URL text box and click on Send.
-
Take a screen shot of the result and save it as method-get-http-code-404.png.
-
In the Method dropdown list, select GET, and enter http://localhost:3000/error in the URL text box and click on Send.
-
Take a screen shot of the result and save it as method-get-http-code-500.png.
HTML coding
-
Create a folder named: app and copy all the previously saved screenshots.
-
Inside the app folder create a file named vanilla.html and copy the code below:
Carefully read the file comments, complete the tasks, and use the HTML template to display your earlier screenshots.
<!--
    Developer Name:
    Purpose:
-->

<!DOCTYPE html>
<html lang="en">
  <head>
    <meta charset="UTF-8" />
    <meta name="viewport" content="width=device-width, initial-scale=1.0" />
    <!-- Enter a description by modifying the content attribute -->
    <meta name="description" content="" />
    <!-- Modify title tag -->
    <title></title>
  </head>

  <body>
    <main>
      <!-- For each screenshot use the template below. -->

      <!-- Template start -->
      <div>
        <!-- Title of the screenshot -->
        <h2>Title of the screenshot</h2>
        <!-- Short description of the screenshot -->
        <p>Short description of the screenshot</p>
        <!-- Screenshot image -->
        <!-- Update the width to your desired percentage -->
        <img src="https://placehold.co/300x200/purple/white" width="100%" />
      </div>
      <!-- Template end -->
    </main>
  </body>
</html>
- Inside the app folder create a file named vanilla-with-css.html and copy the code below:
Carefully read the file comments, complete the tasks, and use the HTML template to display your earlier screenshots. You may also adjust the CSS as needed.
<!DOCTYPE html>
<html lang="en">
  <head>
    <meta charset="UTF-8" />
    <meta name="viewport" content="width=device-width, initial-scale=1.0" />
    <!-- Enter a description by modifying the content attribute -->
    <meta name="description" content="" />
    <!-- Modify title tag -->
    <title></title>
    <style>
      .card {
        /* margin controls the space outside the element.
           50px = top and bottom margin.
           auto = left and right, which centers the element horizontally. */
        margin: 50px auto;
        /* padding is the space inside the element, between its content and border.
           20px = padding on all sides (top, right, bottom, left). */
        padding: 20px;
        /* Sets the background color of the element to white. */
        background-color: white;
        /* Adds a 2-pixel solid border with a gray color. */
        border: 2px solid gray;
        /* Rounds the corners of the box with a radius of 15px. */
        border-radius: 15px;
        /* 4px = horizontal offset (shadow is 4px to the right side of the box).
           4px = vertical offset (shadow is 4px below the box).
           8px = blur radius (how soft / fuzzy the shadow is).
           rgba(0, 0, 0, 0.2) = black color with 20% opacity. */
        box-shadow: 4px 4px 8px rgba(0, 0, 0, 0.2);
        /* Sets the font to a generic sans-serif type (Arial or Helvetica).
           Sans-serif fonts are clean and don't have the little "feet" (serifs) on letters. */
        font-family: sans-serif;
        /* Centers the text content horizontally within the element. */
        text-align: center;
      }

      .imageStyle {
        /* Update the width to your desired percentage */
        width: 100%;
      }
    </style>
  </head>
  <body>
    <!-- For each screenshot use the template below. -->

    <!-- Template start -->
    <div class="card">
      <!-- Title of the screenshot -->
      <h2>Title of the screenshot</h2>
      <!-- Short description of the screenshot -->
      <p>Short description of the screenshot</p>
      <!-- Screenshot image -->
      <img src="https://placehold.co/300x200/purple/white" class="imageStyle" />
    </div>
    <!-- Template end -->
  </body>
</html>
The example above uses embedded CSS. While this approach mixes CSS and HTML in the same file, making it hard to reuse across multiple pages, it’s used here as an exception since this is the first lab. Going forward, using external CSS is preferred.
- Inside the app folder create a file named vanilla-with-css-and-js.html and copy the code below:
Carefully read the file comments, complete the tasks, and use the HTML template to display your earlier screenshots. You may also adjust the CSS as needed.
<!DOCTYPE html>
<html lang="en">
  <head>
    <meta charset="UTF-8" />
    <meta name="viewport" content="width=device-width, initial-scale=1.0" />
    <!-- Enter a description by modifying the content attribute -->
    <meta name="description" content="" />
    <!-- Modify title tag -->
    <title></title>
    <style>
      .card {
        /* margin controls the space outside the element.
           50px = top and bottom margin.
           auto = left and right, which centers the element horizontally. */
        margin: 50px auto;
        /* padding is the space inside the element, between its content and border.
           20px = padding on all sides (top, right, bottom, left). */
        padding: 20px;
        /* Sets the background color of the element to white. */
        background-color: white;
        /* Adds a 2-pixel solid border with a gray color. */
        border: 2px solid gray;
        /* Rounds the corners of the box with a radius of 15px. */
        border-radius: 15px;
        /* 4px = horizontal offset (shadow is 4px to the right side of the box).
           4px = vertical offset (shadow is 4px below the box).
           8px = blur radius (how soft / fuzzy the shadow is).
           rgba(0, 0, 0, 0.2) = black color with 20% opacity. */
        box-shadow: 4px 4px 8px rgba(0, 0, 0, 0.2);
        /* Sets the font to a generic sans-serif type (Arial or Helvetica).
           Sans-serif fonts are clean and don't have the little "feet" (serifs) on letters. */
        font-family: sans-serif;
        /* Centers the text content horizontally within the element. */
        text-align: center;
        /* Transition enables smooth animations when CSS properties change.
           all = means it applies to any animatable CSS property that changes like background-color, box-shadow, or border.
           0.3s = is the duration of the transition (300 milliseconds).
           ease = defines the timing function (starts slow, speeds up, then slows down). */
        transition: all 0.3s ease;
        /* Changes the cursor to a hand icon when hovering over the element. */
        cursor: pointer;
      }

      .imageStyle {
        /* Update the width to your desired percentage */
        width: 100%;
      }

      .active {
        /* Sets the background color of the element to light yellow. */
        background-color: lightyellow;
        /* 8px = horizontal offset (shadow is 4px to the right side of the box).
           8px = vertical offset (shadow is 4px below the box).
           16px = blur radius (how soft / fuzzy the shadow is).
           rgba(0, 0, 0, 0.3) = black color with 30% opacity */
        box-shadow: 8px 8px 16px rgba(0, 0, 0, 0.3);
      }
    </style>
  </head>
  <body>
    <!-- For each screenshot use the template below. -->

    <!-- Template start -->
    <div class="card">
      <!-- Title of the screenshot -->
      <h2>Title of the screenshot</h2>
      <!-- Short description of the screenshot -->
      <p>Short description of the screenshot</p>
      <!-- Screenshot image -->
      <img src="https://placehold.co/300x200/purple/white" class="imageStyle" />
    </div>
    <!-- Template end -->

    <script>
      // Look for elements that have class = card
      const cards = document.querySelectorAll(".card");

      // Add a click listener to each element
      cards.forEach((card) => {
        card.addEventListener("click", () => {
          // If the element does not have the active css class add it, otherwise remove
          card.classList.toggle("active");
        });
      });
    </script>
  </body>
</html>
The example above uses embedded CSS and JS. While this approach mixes CSS, HTML, and JS in the same file, making it hard to reuse across multiple pages, it’s used here as an exception since this is the first lab. Going forward, using external CSS and JS are preferred.
Submission
-
Create a folder named submit.
-
Copy all the contents of the app folder to the submit folder.
-
Create a zip file of the submit folder.
-
Navigate back to where the lab was originally downloaded, there should be a Submissions section (see below) where the zip file can be uploaded.