Lab-5-1
(8% of the course mark)
JavaScript on the Browser hands-on exercises
- The JavaScript on the Browser Lab is a hands-on workshop designed to provide participants with exercises that use JavaScript code to interact with and manipulate the Document Object Model (DOM) of a web page. This enables dynamic behavior and interactivity on websites, allowing developers to respond to user actions, update content, and create interactive web applications. Async, Await and Fetch are used for practicing asynchronous JavaScript programming techniques.
Lab objectives
-
Familiarize participants with Document object model (DOM) and event driven programming concepts.
-
Understand JSON data structure via usage of the JSON.parse() function
-
Gain proficiency in the following:
-
Utilization of third party API’s to consume data.
-
Async and Await to demonstrate JavScript Asynchronous Programming
-
Usage of Fetch API to consume data via HTTP calls.
-
Application of Regular expressions for pattern matching.
-
Password Complexity App
-
Download and extract the file PasswordComplexityShell.zip.
-
Open Visual Studio Code and open the folder of the directory where the folders and files were extracted.
-
Open the file PasswordComplexity.html and copy the code below:
<!-- Developer: Roderick Bernardo -->
<!-- Purpose: Password Complexity Demo -->

<!-- Read the comments carefully and perform the specified tasks -->

<!DOCTYPE html>
<html lang="en">
  <head>
    <meta charset="UTF-8" />
    <meta name="viewport" content="width=device-width, initial-scale=1.0" />
    <!-- Set the title text -->
    <title></title>
    <!-- Set to the location of the css -->
    <link rel="stylesheet" href="" />
    <!-- Set to the location of the js -->
    <script defer src=""></script>
  </head>
  <body>
    <!-- Set the class to centerVericalHorizontal -->
    <main class="">
      <!-- Set the class to container -->
      <div class="">
        <!-- Set the class subContainer -->
        <section class="">
          <!-- Set input type to text -->
          <!-- Set id to passwordToProcess -->
          <input type="" id="" />
        </section>
        <!-- Set class to subContainer -->
        <section class="">
          <!-- Set paragragh text to Password Rules -->
          <p></p>
          <ol>
            <li>
              <!-- Set id lengthCheckIndicatorId -->
              <!-- Set src to the location of error.jpg -->
              <!-- Set class to indicators -->
              <img id="" src="" class="" />
              <!-- Set id to lengthCheckTextId -->
              <!-- Set class to errorState -->
              <span id="" class=""></span>
            </li>
            <li>
              <!-- Set id numberCheckIndicatorId -->
              <!-- Set src to the location of error.jpg -->
              <!-- Set class to indicators -->
              <img id="" src="" class="" />
              <!-- Set id to numberCheckTextId -->
              <!-- Set class to errorState -->
              <span id="" class=""></span>
            </li>
            <li>
              <!-- Set id caseCheckIndicatorId -->
              <!-- Set src to the location of error.jpg -->
              <!-- Set class to indicators -->
              <img id="" src="" class="" />
              <!-- Set id to caseCheckTextId -->
              <!-- Set class to errorState -->
              <span id="" class=""></span>
            </li>
            <li>
              <!-- Set id specialCharCheckIndicatorId -->
              <!-- Set src to the location of error.jpg -->
              <!-- Set class to indicators -->
              <img id="" src="" class="" />
              <!-- Set id to specialCharCheckTextId -->
              <!-- Set class to errorState -->
              <span id="" class=""></span>
            </li>
          </ol>
        </section>
      </div>
    </main>
  </body>
</html>
- Open the file PasswordComplexity.js and copy the code below:
/*
Developer: Roderick Bernardo
Purpose: Password Complexity Demo
*/
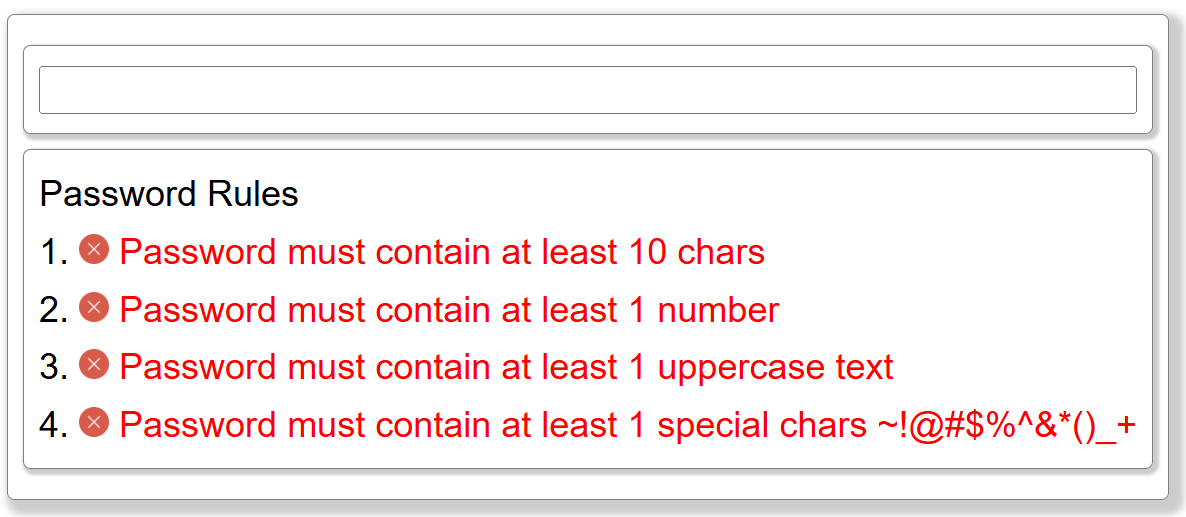
const MIN_LENGTH = 10;
// Location of the icons
const successImgPath = "./assets/images/success.png";
const errorImgPath = "./assets/images/error.png";
// Message text used by the app
const appMessages = {
lengthCheckTextId: {
errorText: "Password must contain at least 10 chars",
successText: "Password has at least 10 chars",
},
numberCheckTextId: {
errorText: "Password must contain at least 1 number",
successText: "Password has at least 1 number",
},
caseCheckTextId: {
errorText: "Password must contain at least 1 uppercase text",
successText: "Password has at least 1 uppercase text",
},
specialCharCheckTextId: {
errorText: "Password must contain at least 1 special chars ~!@#$%^&*()_+",
successText: "Password has at least 1 special chars ~!@#$%^&*()_+",
},
};
// Set the default values, look of the element with a particular id and set the message based on the same id
// Update id to lengthCheckTextId
document.getElementById("id").innerText = appMessages["id"].errorText;
// Update id to numberCheckTextId
document.getElementById("id").innerText = appMessages["id"].errorText;
// Update id to caseCheckTextId
document.getElementById("id").innerText = appMessages["id"].errorText;
// Update id to specialCharCheckTextId
document.getElementById("id").innerText = appMessages["id"].errorText;
function addListeners() {
// Look for the element passwordToProcess and add an input listener to this
// Update id to passwordToProcess
// Update eventType to input
document.getElementById("id").addEventListener("eventType", (event) => {
// When there is a input event call the functions below
//////////////////////////////////////////////////////////////////
// Check the length of the input //
// Call the lengthCheck function with the following parameters: //
//////////////////////////////////////////////////////////////////
// event.target.value
// "lengthCheckIndicatorId"
// "lengthCheckTextId"
//////////////////////////////////////////////////////////////////
// Check if the input has a number //
// Call the numberCheck function with the following parameters: //
//////////////////////////////////////////////////////////////////
// event.target.value
// "numberCheckIndicatorId"
// "numberCheckTextId"
////////////////////////////////////////////////////////////////
// Check for case of the input //
// Call the caseCheck function with the following parameters: //
////////////////////////////////////////////////////////////////
// event.target.value
// "caseCheckIndicatorId"
// "caseCheckTextId"
///////////////////////////////////////////////////////////////////////
// Check if special chars are included in the input //
// Call the specialCharCheck function with the following parameters: //
///////////////////////////////////////////////////////////////////////
// event.target.value
// "specialCharCheckIndicatorId"
// "specialCharCheckTextId"
});
}
function lengthCheck(value, indicatorId, textId) {
// Set elementIndicator to document.getElementById(indicatorId)
const elementIndicator = "";
// Set elementText to document.getElementById(textId)
const elementText = "";
if (value.length >= MIN_LENGTH) {
setElementValues(true, elementIndicator, elementText, textId);
} else {
setElementValues(false, elementIndicator, elementText, textId);
}
}
function numberCheck(value, indicatorId, textId) {
// Set elementIndicator to document.getElementById(indicatorId)
const elementIndicator = "";
// Set elementText to document.getElementById(textId)
const elementText = "";
// https://developer.mozilla.org/en-US/docs/Web/JavaScript/Guide/Regular_expressions
// Check if the char is a digit
const regex = /\d/;
if (regex.test(value)) {
setElementValues(true, elementIndicator, elementText, textId);
} else {
setElementValues(false, elementIndicator, elementText, textId);
}
}
function caseCheck(value, indicatorId, textId) {
// Set elementIndicator to document.getElementById(indicatorId)
const elementIndicator = "";
// Set elementText to document.getElementById(textId)
const elementText = "";
// https://developer.mozilla.org/en-US/docs/Web/JavaScript/Guide/Regular_expressions
// Check if the char is uppercase
const regex = /[A-Z]/;
if (regex.test(value)) {
setElementValues(true, elementIndicator, elementText, textId);
} else {
setElementValues(false, elementIndicator, elementText, textId);
}
}
function specialCharCheck(value, indicatorId, textId) {
// Set elementIndicator to document.getElementById(indicatorId)
const elementIndicator = "";
// Set elementText to document.getElementById(textId)
const elementText = "";
// https://developer.mozilla.org/en-US/docs/Web/JavaScript/Guide/Regular_expressions
// Check if the char matches one of chars on the character class
const regex = /[~!@#$%^&*()_+]/;
if (regex.test(value)) {
setElementValues(true, elementIndicator, elementText, textId);
} else {
setElementValues(false, elementIndicator, elementText, textId);
}
}
function setElementValues(isSuccess, elementIndicator, elementText, textId) {
if (isSuccess) {
elementIndicator.src = successImgPath;
elementText.innerText = appMessages[textId].successText;
elementText.className = "";
} else {
elementIndicator.src = errorImgPath;
elementText.innerText = appMessages[textId].errorText;
elementText.className = "errorState";
}
}
// Call the addListeners() function
- On Visual Studio Code you can test the app by right clicking on PasswordComplexity.html and selecting Open with Live Server.
If you are having issues with the PasswordComplexity app, you can check the git repo.
Name Validator App
-
Build an app that accepts two text inputs: first name and last name.
-
The app should validate each input to ensure it is a valid name. For simplicity, a valid name consists only of alphabetic characters and must be at least two characters long. If either input is invalid, display an error message indicating that the entered text is not valid.
Feel free to come up with your own design and use any HTML, CSS, and JavaScript concepts you find suitable.
Random User App
-
Download and extract the file RandomUserShell.zip.
-
Open Visual Studio Code and open the folder of the directory where the folders and files were extracted.
-
Open the file RandomUser.html and copy the code below:
<!-- Developer: Roderick Bernardo -->
<!-- Purpose: Random User demo -->

<!DOCTYPE html>
<html lang="en">
  <head>
    <meta charset="UTF-8" />
    <meta name="viewport" content="width=device-width, initial-scale=1.0" />
    <!-- Set the title text -->
    <title></title>
    <!-- Set to the location of the css -->
    <link rel="stylesheet" href="" />
    <!-- Set to the location of the js -->
    <script defer src=""></script>
  </head>
  <body>
    <!-- Set the class to centerVericalHorizontal -->
    <main class="">
      <!-- Set the class to container -->
      <section class="">
        <!-- Set the class to subContainer -->
        <div class="">
          <!-- Set the class to circularImageDiv -->
          <div class="">
            <!-- Set the id to circularImageId -->
            <!-- Dont worry about the src it will be dynamically populated -->
            <img id="" src="" />
          </div>
        </div>
        <!-- Set class to subContainer -->
        <div class="">
          <!-- Set class to infoDiv -->
          <div class="">
            <!-- Set id to infoTitleId and the class to infoTitle -->
            <p id="" class=""></p>
            <!-- Set id to infoValueId and the class to infoValue -->
            <p id="" class=""></p>
          </div>
          <!-- Set class to iconDivFlex -->
          <div class="">
            <!-- Set id to nameDivId and class to nameDiv -->
            <div id="" class="">
              <!-- Set the src to ./assets/images/name.png -->
              <img src="" />
            </div>
            <!-- Set id to emailDivId and class to emailDiv -->
            <div id="" class="">
              <!-- Set the src to ./assets/images/email.png -->
              <img src="" />
            </div>
            <!-- Set id to addressDivId and class to addressDiv -->
            <div id="" class="">
              <!-- Set the src to ./assets/images/address.png -->
              <img src="" />
            </div>
            <!-- Set id to phoneDivId and class to phoneDiv -->
            <div id="" class="">
              <!-- Set the src to ./assets/images/phone.png -->
              <img src="" />
            </div>
          </div>
        </div>
      </section>
    </main>
  </body>
</html>
- Open the file RandomUser.js and copy the code below:
/*
Developer: Roderick Bernardo
Purpose: Random User demo
*/
function addEventListener(data) {
// Set infoTitleId to infoTitleId
// Set infoValueId to infoValueId
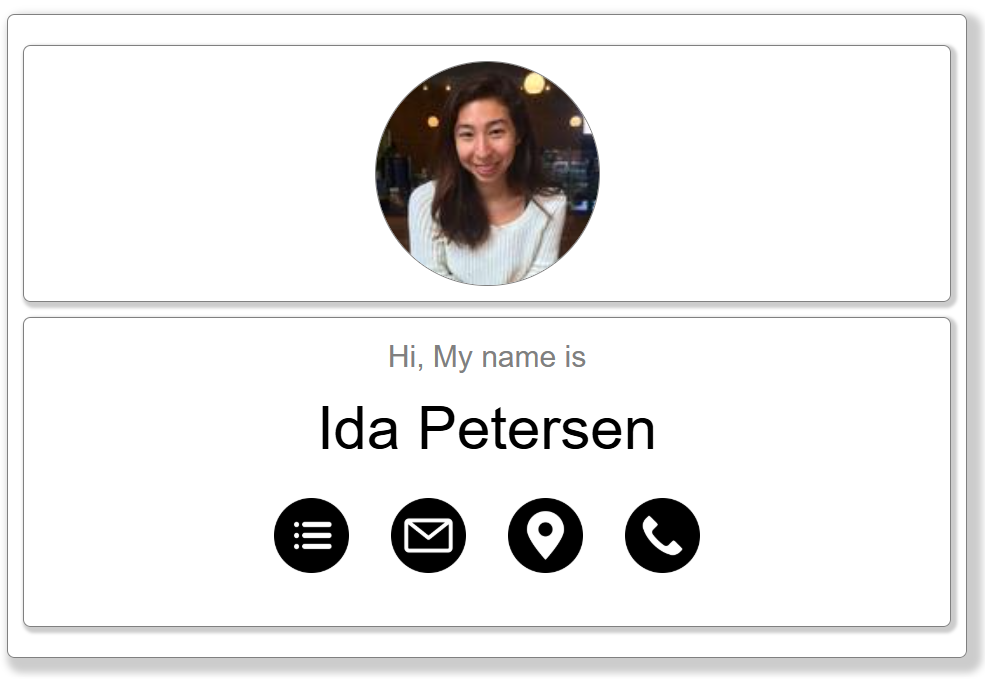
// Set title to Hi, My name is,
// Set value to ${data.results[0].name.first} ${data.results[0].name.last},
const updateDisplayParamObject = {
infoTitleId: "",
infoValueId: "",
title: "",
value: ``,
};
// Call the setDefault function with the following parameters:
// updateDisplayParamObject
// "circularImageId"
// data.results[0].picture.large
// Update the id to nameDivId
// Set the eventType to mouseover
document.getElementById("id").addEventListener("eventType", (event) => {
// Call the updateDisplay function with the following parameters:
// "infoTitleId"
// "infoValueId"
// "Hi, My name is"
// `${data.results[0].name.first} ${data.results[0].name.last}`
});
// Update the id to emailDivId
// Set the eventType to mouseover
document.getElementById("id").addEventListener("eventType", (event) => {
// Call the updateDisplay function with the following parameters:
// "infoTitleId"
// "infoValueId"
// "My email address is"
// data.results[0].email
});
// Update the id to addressDivId
// Set the eventType to mouseover
document.getElementById("id").addEventListener("eventType", (event) => {
// Call the updateDisplay function with the following parameters:
// "infoTitleId"
// "infoValueId"
// "My address is"
// `${data.results[0].location.street.number} ${data.results[0].location.street.name}`
});
// Update the id to phoneDivId
// Set the eventType to mouseover
document.getElementById("id").addEventListener("eventType", (event) => {
// Call the updateDisplay function with the following parameters:
// "infoTitleId"
// "infoValueId"
// "My phone number is"
// data.results[0].phone
});
}
function setDefault(updateDisplayParamObject, circularImageId, imageUrl) {
document.getElementById(circularImageId).src = imageUrl;
updateDisplay(
updateDisplayParamObject.infoTitleId,
updateDisplayParamObject.infoValueId,
updateDisplayParamObject.title,
updateDisplayParamObject.value
);
}
async function getData() {
const restEndpoint = "https://randomuser.me/api";
const response = await fetch(`${restEndpoint}`);
if (response.status >= 200 && response.status < 400) {
const data = await response.json();
addEventListener(data);
} else {
console.error(
`Server Response: status: ${response.status} statusText: ${response.statusText}`
);
}
}
function updateDisplay(infoTitleId, infoValueId, infoTitleText, infoValueText) {
document.getElementById(infoTitleId).innerText = infoTitleText;
document.getElementById(infoValueId).innerText = infoValueText;
}
// Call the getData() function
- On Visual Studio Code you can test the app by right clicking on RandomUser.html and selecting Open with Live Server.
If you are having issues with the RandomUser app, you can check the git repo.
Open Weather App
-
Navigate to https://openweathermap.org and sign in with your Open Weather account.
-
On the menu click on your account and select My API Keys.
-
Make sure to take note of the API key. If you don't have one, you can create it.
-
Open your browser and enter this url: https://api.openweathermap.org/data/2.5/weather?units=metric&appid=MY_API_KEY&q=Toronto. Replace MY_API_KEY with the your API key.
Ensure that you are receiving a valid response from OpenWeather. You should see something similar to the example below:
Partial Browser output:
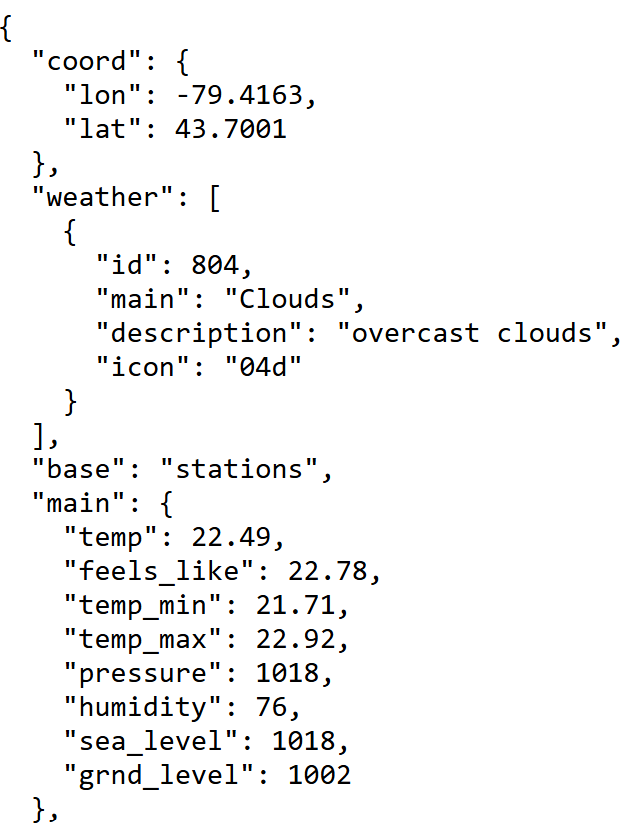
Complete JSON output:
{
  "coord": {
    "lon": -79.4163,
    "lat": 43.7001
  },
  "weather": [
    {
      "id": 804,
      "main": "Clouds",
      "description": "overcast clouds",
      "icon": "04d"
    }
  ],
  "base": "stations",
  "main": {
    "temp": 22.49,
    "feels_like": 22.78,
    "temp_min": 21.71,
    "temp_max": 22.92,
    "pressure": 1018,
    "humidity": 76,
    "sea_level": 1018,
    "grnd_level": 1002
  },
  "visibility": 10000,
  "wind": {
    "speed": 0.89,
    "deg": 173,
    "gust": 2.24
  },
  "clouds": {
    "all": 100
  },
  "dt": 1751986062,
  "sys": {
    "type": 2,
    "id": 2010632,
    "country": "CA",
    "sunrise": 1751967853,
    "sunset": 1752022856
  },
  "timezone": -14400,
  "id": 6167865,
  "name": "Toronto",
  "cod": 200
}
-
Open Visual Studio Code and create folder named: weather.
-
Inside the weather folder, create weather.html and copy the code below:
<!-- Developer: -->
<!-- Purpose: -->

<!DOCTYPE html>
<html>
  <head>
    <meta charset="utf-8" />
    <meta name="viewport" content="width=device-width, initial-scale=1" />
    <!-- Set the title text -->
    <title></title>
    <!-- Set rel to stylesheet -->
    <!-- Set href to https://cdn.jsdelivr.net/npm/sakura.css/css/sakura.css -->
    <link />
    <!-- Set the defer attribute -->
    <!-- Set src to ./script.js -->
    <script></script>
  </head>
  <body>
    <section>
      <div>
        <h1>Open Weather API</h1>
        <!-- Set the id to weatherForm -->
        <!-- Set the method to POST -->
        <form>
          <!-- Set the label for attribute to city -->
          <!-- Set the label text to City -->
          <label></label>
          <!-- Set the input type attribute to text -->
          <!-- Set the input id attribute to city -->
          <!-- Set the input name attribute to city -->
          <!-- Set the input placeholder attribute to Enter your city -->
          <input />
          <div>
            <!-- Set the input type attribute to submit -->
            <input />
          </div>
        </form>
      </div>
      <div>
        <blockquote>
          <!-- Set the b text to 🌡️ Temperature: -->
          <!-- Set the span id attribute to temp -->
          <p><b></b> <span></span></p>
        </blockquote>
        <blockquote>
          <!-- Set the b text to 💦 Feels like: -->
          <!-- Set the span id attribute to feels_like -->
          <p><b></b> <span></span></p>
        </blockquote>
      </div>
    </section>
  </body>
</html>
- Inside the weather folder, create script.js and copy the code below:
// Developer:
// Purpose:

// Set the value of OPEN_WEATHER_API_KEY to your own personal Open Weather API key
const OPEN_WEATHER_API_KEY = "";
const URL = `https://api.openweathermap.org/data/2.5/weather?units=metric&appid=${OPEN_WEATHER_API_KEY}&q=`;
// Replace the id to weatherForm
// This is the id of the form
const weatherForm = document.getElementById("id");

// Set the eventType to submit
weatherForm.addEventListener("eventType", (event) => {
  event.preventDefault();
  // Replace the id to city
  // This is the id of the city text box
  const city = document.getElementById("id");
  getData(city.value);
});

async function getData(city) {
  const response = await fetch(`${URL}${city}`);
  if (response.status >= 200 && response.status < 400) {
    const data = await response.json();
    displayData(data);
  } else {
    console.error(
      `Server Response: status: ${response.status} statusText: ${response.statusText}`
    );

    displayData({
      main: {
        temp: 0,
        feels_like: 0,
      },
    });
  }
}

function displayData(data) {
  document.getElementById("temp").innerHTML = data.main.temp;
  document.getElementById("feels_like").innerHTML = data.main.feels_like;
}
-
Test the Open Weather app by right clicking on weather.html and selecting Open with Live Server. Test the app by entering a valid capital city in the text box. It should return the current and the feels like temperature. Also enter an invalid city, the values of the current and feels like temperature should be set to zero. Confirm that the browser console displays an error 404. Take a screen shot of this and name it open-weather-error-404.png.
-
Modify weather.html and script.js files and add the following attributes: temp_min and temp_max from the Open Weather JSON output these attributes represents the minimum and maximum temperature for a particular city.
Submission
-
Create a folder named submit.
-
Copy all the files such as HTML, CSS, JS and images to the submit folder.
-
Create a zip file of this folder.
-
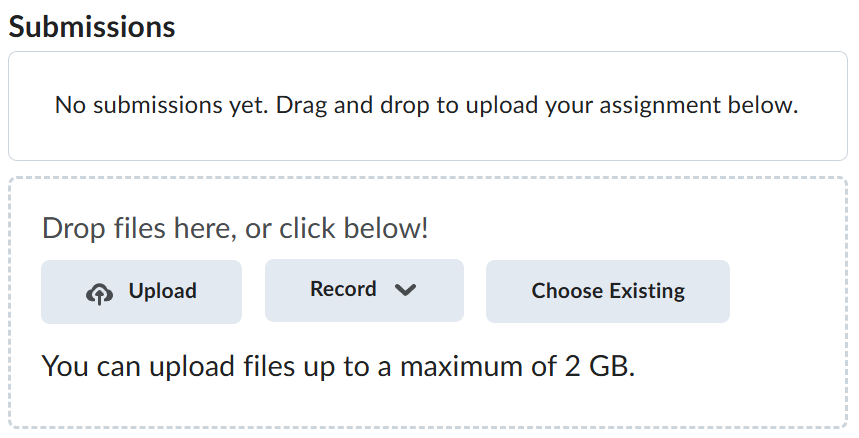
Navigate back to where the lab was originally downloaded, there should be a Submissions section (see below) where the zip file can be uploaded.